This article was last updated on 28/06/2025.
There’s something unmistakably romantic about old-world florals — well, all of fine art, really. In our studio, we’re a little obsessed with weaving those details into stationery. Whether it’s a quirky hand-drawn sketch or a Renaissance still life, there’s just something about pairing fine art with paper that feels timeless.
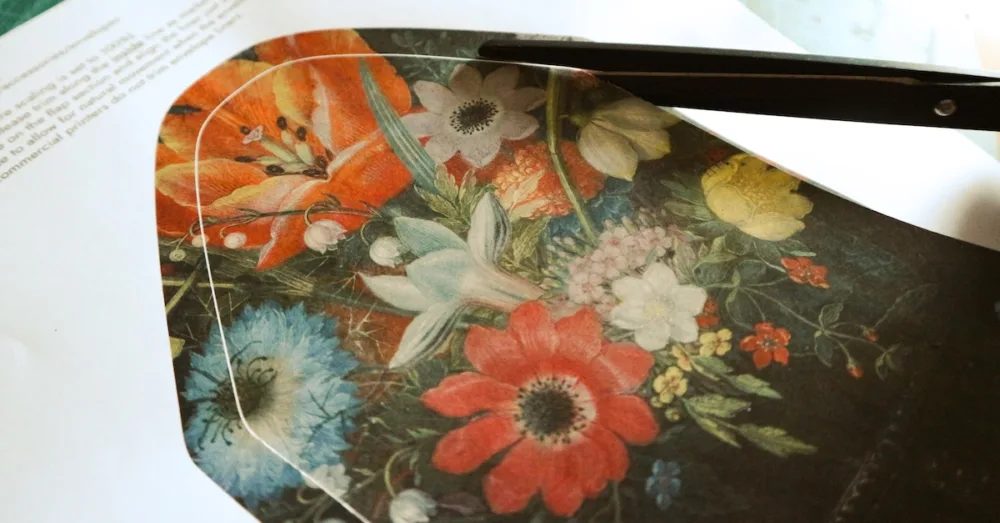
This free envelope liner template was made with that same something in mind. Featuring the delicate brushstrokes of Peter Binoit’s Still Life with Iris (painted in 1623!), it adds a moody, painterly touch to your invitations and envelopes.

Envelope Size
This free envelope liner template is made to fit MOO envelopes (one of our favourite suppliers for printing invitations online). Inside the ZIP folder, you’ll find four printable enveloper liner PDFs for the following MOO envelope options:
- Square – 125 × 125 mm
- Small – 155 × 110 mm
- Medium – 184 × 133 mm
- DL – 220 × 110 mm
They’re sized specifically for MOO’s dimensions, so we can’t guarantee they’ll fit envelopes from other brands. If you’re using these for your invitations, we recommend choosing the White Luxe envelopes. They’re thicker, beautifully textured, and feel much more tactile than the standard range.
How to Use the Template
For step-by-step photos and extra tips, read our full tutorial: How to Use Our Printable Envelope Liners.
- Print the PDF template on A4 (210x297mm) paper at 100% scale. We recommend using a laser or toner-based printer for these, as the artwork can use up a lot of precious inkjet ink.
- For best results, print the liners on smooth paper stock. Most standard office paper (80-100gsm) will work well. We suggest avoiding heavily textured paper, as it can affect both the print quality and how the liner sits inside the envelope.
- Please note that the template includes bleed. Trim along the inside guideline as marked using scissors or a craft knife.
- Apply double-sided tape to the back of the envelope liner’s flaps, then slide the liner into the envelope. Position the liner so that it sits under the envelope gum. Once it’s positioned correctly, peel off the tape backing and press the liner down to secure it. Gently fold the envelope at the crease to “set” the liner in place. Leave the rest of the liner loose so it can move naturally when the envelope is opened and closed.
Note: You can use glue if you prefer, but in our experience, it often causes the paper to buckle. If you do use glue, position the liner first before gluing the liner down.
Download
Download the liner below and give your stationery a little moment of art history.
Enjoy!
We love creating wedding and event stationery and these free printables were designed so that we can share the stationery love. We believe in practicality and affordability – everyone should have access to beautiful stationery without hefty price tags.
These printable files are free for personal use only – we kindly ask that you don’t resell or reproduce this design for commercial purposes. Please see our Copyright Policy for more information.
You can view more of our editable templates and printable designs in our online shop.
—
Please note that some of the links in this post are affiliate links and any purchase made through the links will give us a small commission (at absolutely no extra cost to you). Please read our Affiliate Disclaimer for more info.